Gasoline Electric Power Generator Home Maintenance GR 3500- ES
PORTABLE GENERATOR MAINTENANCE CHECKLIST
When performing general maintenance, generator personnel will inspect your machines, maintain records of their data, and practice preventive safety measures. Here’s a portable generator maintenance checklist to ensure all essential elements are examined:
- Fluid levels fuel, and engine oil
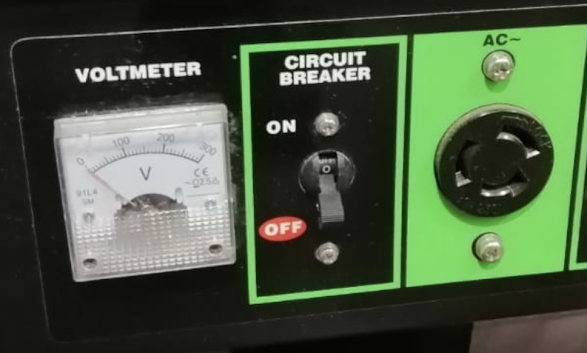
- That the circuit breaker is closed
- Battery, charger, and cables
- Battery electrolyte level and specific gravity
- Exhaust system, muffler, and pipe
INSPECT
- Generator for leaks
CLEAN
- Connections
CHANGE
- Air filters ( Check if the Air filter is damaged if not just cleaning the dust will be fine )
- After each use: Change the gas and store it safely
- Weekly: Check the air filters
- Monthly: Start your generator up and test your system
Some additional best practices to follow
- Check and record all gauges and timer readings
- Set exercise cycles
- Test transfer switch operations (This is not related to generator but transfer switch failure cause to power leakage and it will damage your generator so make sure it will isolate the main power grid without any issues)
A relatively common reason portable generators won’t start is because of a bad spark plug. Either the plug is dirty, compromising its connection, or it could be on its last leg and have trouble igniting. Either way, if the plug isn’t creating an arc of electricity, your generator could be struggling to power up.
Make sure your engine has fully cooled before removing your plug and inspecting it. If it’s marred up, clean it with a wire brush and insert back into your generator with a torque wrench. When doing this yourself, be careful not to over-crank and strip the threads on your plug, which could compromise your connection or even break your porcelain insulator and cause damage to your engine. If the plug looks fine on the outside, try swapping it out for a new one and see if that helps.
Even if your generator isn’t experiencing problems and you’re just giving it a routine checkup, it might be time to replace the plug. As a general rule of thumb, if your air filter is dirty enough to need cleaning or replacement, it’s time to replace that spark plug too.

With time and usage, your portable generator’s fuel lines can become cracked, torn, or clogged. This can prevent the supply of gas from reaching the fuel system and cause your generator to not start or run efficiently.
While you can do some DIY work to clear a clogged fuel line, it’s often easier and more reassuring to simply replace a worn or problematic fuel line— especially because they’re sold in many sizes and are often pretty cheap.
Maintaining your generator’s oil is one of the easiest ways to ensure your generator runs reliably when you need it to. From installation to regular oil changes, use these tips to keep your generator’s engine lubricated and running smoothly.
- Check your generator’s oil level after installation. Your generator may have been shipped without any oil. If your installer didn’t add oil, you will need to.
- Always follow the manufacturer’s guidelines when it comes to oil type. Different generators require unique oils depending on the engine and fuel type.
- Consider the temperature your generator will operate at. In cold temperatures, this equates to lower-viscosity oil and in hot temperatures, your generator will require higher-viscosity oil. As Perkins’ operation manuals state, you will generally want to “use the highest oil viscosity that is available to meet the requirement for the temperature at start-up.”
- Your first generator oil change will be sooner than other oil changes. Refer to your owner’s manual to determine the specific number of hours before your first oil change. It may be as soon as eight hours into your break-in process.
- Change your generator’s oil regularly, at the interval outlined in your owner’s manual. For smaller gas generators, this may be as often as every 50 hours or 100 hours or Every 6 months.
- If applicable, change your oil filter when you change your generator’s oil.
- When refuelling, top off the oil reservoir if necessary.
- Keep extra oil and filters on hand so you are prepared to change oil regularly during power outages, when your generator may be running for hundreds of hours consecutively.
- Take into account the atmosphere your generator is running in when determining when to change oil. Dusty job sites will result in dirtier oil, which should be changed more regularly than oil that is not contaminated by large airborne particles.
- After a power outage that required your generator to run for a long time, check your oil levels and change if necessary. This way, you’ll be ready for the next time you need to rely on your generator.
- Many generators shut off automatically if oil is low in order to protect the engine. If your generator is not working properly, check the oil reservoir and top off or change before conducting further diagnostics.
- When checking oil levels or performing an oil change, clean dirt and debris from the area.
- The correct type of new oil
- Drain oil canister/can
- Oil funnel
- The correct socket wrench size
- Ratchet and oil filter wrench
- Flat and Phillips screwdriver
Changing the Oil
1) Warm the EngineWarming the oil by turning on the engine for a few minutes allows it to drain easier. Once the oil is warm, shut off your engine and allow it to cool before servicing your generator.
3) Oil Drain Pan
7) Refill with New Oil
Screw the oil dipstick back into the oil fill tube and wipe up any excess oil.
Instructions for GR3500-ES
- Recommended Oil is 10W-30 or Higher
- Oil volume 0.6 L
- Automatic voltage regulator (reduction of electrical fluctuations)
- Anti-vibration (reduction of device vibrations)
- Oil protection system (prevent the device from starting when there is a shortage of oil
- All copper coil
- Electric starter with battery for quick and easy operation
Model GR3500-ES Rated power (kw) 2.5 Maximum power (kw) 2.8 Voltage (v) 220 Frequency (Hz) 50 Engine type Single cylinder, four-stroke, air-cooled, OHV, gasoline engine Engine volume (ml) 196 Engine power (HP / rpm) 6.5 / 4000 Spark system TCI magnet Oil volume (L) 0.6 Type of oil SAE15-40SE or higher start Electric with battery Fuel volume (L) 15 Dimensions (mm) 535 * 550 * 615 Weight (kg) 47.5 Voltage regulation system (kw) AVR Accessories -
GR3500-ES Generator Quick Start Guide
Preparation
1. Consult your owner’s manualWe all hate reading owner’s manuals. But every product has unique quirks and operating procedures. So, check your manual to make sure you assemble the generator correctly and know how to start it properly. Here's an example of one brand's quick-start manual.
2. Check for damage or gas leak
If your building was struck by a storm, it’s a good idea to check for damage. Most importantly, you don’t want to use a gasoline-fueled generator if you have experienced a natural gas leak.
3. Move your generator outside, away from the house
We can't stress this point enough: run your generator outside, at least 15 feet from your house. NEVER operate a generator inside of your home, garage, or shed. If you use a generator inside your garage you could be killed by carbon monoxide poisoning within minutes.
4. Don’t operate your generator (unprotected) in a storm Heavy rain can cause electrical shock and damage to the engine. But if you need to run a generator while it's raining, you can buy a generator tent to help protect your product from the elements.
5. Check fuel levels for oil and gas
You use gas to fuel a portable generator. Always make sure you fill up your generator with FRESH gasoline. Ethanol in the gas will absorb water over time. Stale gasoline not only makes it harder or impossible to start, but can damage the engine. Also, check the oil level of your generator to make sure the engine gets proper lubrication. Fill the oil up to the line specified on the generator.
6. Remove any cords plugged into the generator
Before starting the generator, disconnect all cords. You should start your generator before connecting it to your home. You don't want any load attached during the startup.
How to Start
Flip the fuel valve on. When the fuel valve is released, fuel travels to the carburettor to help the generator start.
Move the choke rod from right to left. This makes it easier for the engine to start running.
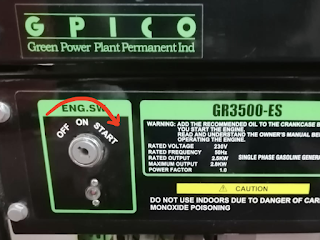
3. Turn ignition (or engine switch) on
Many generators require you to flip the switch to turn the engine on. This is essentially an engine switch that will flip on before you pull the recoil cord or turn the key to start position.
4. Pull recoil cord or turn the key to start position.
When you pull the recoil cord, you are actually starting the engine. Pull the recoil cord Press self start button until you feel a bit of resistance and then let it go back. If the engine doesn’t start, try pulling the cord/ Press self start button again.PRO TIP: If the engine doesn’t start, move the choke to full from left to right and pull the recoil cord/ Press self start button again.
5. After the engine starts, move engine choke to “run”
When the engine has been running for a few moments, you can move the choke back to the “run” position.
Connecting Your Generator to Your Home
Let the generator run a few minutes before plugging in any cords. Also, make sure you have turned your circuit breakers on. After it has run for 3-5 minutes, you can begin connecting it to the house.
Best documentation practices for maintaining a home generator.
AVR Regulation
An AVR takes in a range of voltage levels and automatically outputs a voltage with a much narrower range of voltage levels. For example, a typical automatic voltage regulator for power quality application may have an input voltage range of +10% to -25% of the nominal input voltage and convert this to a regulated voltage range of +3% to -3% of the nominal output voltage as shown the graphic for a 480V input and output. A voltage regulator may have a symmetrical input voltage range (e.g. +10% to -10% of nominal voltage) or an asymmetrical input voltage range as shown in the example. The choice of symmetrical versus asymmetrical input voltage range is dictated by purpose and design of the voltage regulator. The output voltage regulation range is almost universally symmetrical (e.g. +3% to -3% of nominal output voltage).
A voltage regulator may also perform a voltage step up or step down function whereby the nominal incoming voltage is transformed to a different output voltage level (e.g. a step up from a 208V input to a 400V output). For a voltage regulator with step up or step down capability, the input and output voltage ranges are usually applied to the input and output voltages (e.g. the example would become 208V +10/-25% on the input voltage range and 400V +3%/-3% for the regulated output range).


Comments
Post a Comment