LG Top Load Washer - PE Error code ( Water Level / Pressure Sensor ) FIX

LG Error code details : https://www.lg.com/us/support/help-library/error-codes-washing-machine-CT00000305-20150140270078
PE Error Code

PE The error indicates that there is a problem with the water level sensor.
How a Pressure Switch Works in a Washing Machine


A pressure switch, or water level control, allows your washing machine to detect when it's sufficiently filled. It can then close the valve from which your home or building's water supply into the machine.
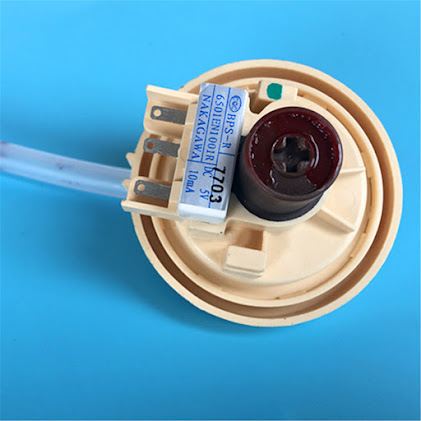
Pressure Hose
Your washer contains an air-tight hose that runs from the body of the washer to the pressure switch. As the washer fills with water, the air that was in it is displaced, and has no way to escape but through the hose, gradually increasing the pressure on the switch.
Water Level Setting
Most washers allow you to set the desired water level yourself (usually low/medium/high settings). This simply changes the threshold of pressure at which the switch is told to redirect the power---the higher the threshold, the more air will have to be displaced, and the higher the water level.

Switch Problems
The pressure switch setup is relatively simple, but still contains several opportunities for failure. If the pressure hose develops a leak or is attached too loosely, air will escape and the switch may never be flipped, causing your washer to overfill. If the hose becomes clogged, the switch may consistently read the water level as too high, and never allow the washer to start. If the electrical contacts on the switch are damaged, it may be unable to redirect power directly. Examine the pressure hose and check the switch with a voltmeter if you're having water-level problems with your washer.
Identifying the Water Level Switch
The water level switch is found in different places on different machines—in many cases, it’s inside the control console, but check your owner's manual to find out where yours is.
You can distinguish the water level switch from other round switches inside the washer cabinet by its rubber tube that runs from the switch down the side of the tub. As the washer fills, water enters the tube from the bottom and increases pressure in the airspace within the tube. When the pressure reaches the critical point, the switch shuts off water flow to the tub.

Inspecting the Tube
Inspect the water level tube and, if necessary, clear any blockage. Always unplug the machine from the wall outlet before doing any inspection or working on your washing machine.
- Find and inspect the tube that leads from the bottom of the water level switch to the bottom of the tub. It should be firmly connected to fittings at each end.
- Disconnect the tube from the fittings to which it’s attached at each end. This usually involves loosening clamps so that you can pull the tube off the fitting.
- Inspect the disconnected tube at each end for debris, sediment, and water.
- Inspect the tube for kinks and/or holes. Correct any problems by straightening or replacing the tube.
- Clean and clear the tube if you find gunk in it. A good cleaning may be all that’s needed to correct a malfunctioning switch, but continue troubleshooting with the next step.
Testing the Switch
Find the wires leading to the terminals of the switch. Disconnect them from the terminals: This usually means disengaging a wire plug, but if the wires are connected to the terminals by other means, label them for position before disconnecting them.

The water level switch has three terminals. Test them for continuity in pairs.
- First, touch the meter probes to terminals 1 and 2. Note the reading, which should be either ∞ (infinity, which means no continuity) or some value close to 0.0 (continuity).
- Touch the probes to terminals 1 and 3, and note the reading (∞ or approximately 0.0).
- Touch the probes to terminals 2 and 3, and note the reading.
Analyze the results of the continuity tests: Two of the pairs should have no continuity, and one should have continuity. If you get a different result, the switch is bad and needs to be replaced.
Reconnect the tube to the switch in preparation for the second round of continuity testing, and leave the other end of the tube disconnected.
Blow gently into the tube while retesting the terminals for continuity in pairs, using the same sequence as in the first round of testing. You should hear the switch click when you blow into the tube. Maintain the air pressure by pinching the tube closed as you test the terminals, and note the results.
Analyze the results of the second round of testing, and compare them to those of the first round. The pairs that showed no continuity in the first round should show continuity in the second round (with pressure in the tube). The pair that showed continuity in the first round should show no continuity in the second. Results other than these mean that the switch is bad and needs to be replaced.
If the continuity testing does not indicate an electrical problem in the switch, reconnect the clean, straightened pressure tube to the nipple at the bottom of the tub and run the machine through a cycle to see whether the problem has been corrected.


Comments
Post a Comment